Tuesday, December 18, 2012

Could this be my calling?


Faux Goodies
My husband's sister passed away this past October, and the funds for her burial were next to non-existing, so the church and community pulled together in putting on an auction to raise money to cover part of the funeral expenses.Several friends and family donated their services and put together quite a nice auction. Many of us donated items from our own homes to be sold, while others gathered donations from local businesses, and others,contributed baked goods to be auctioned off.I contributed many of my own dishes, crafts and numerous household items.Among the crafts I contributed was a plate of my Faux Goodies.I had attached a bright pink tag, stating that the items were "Not Edible".Some folks claimed they saw the tag, others said they did not, but I know for a fact, I did attach a tag.Nevertheless, I guess you know where I am going with this. Someone bit into one of the goodies. I didn't see it personally. I was too busy working the food line, but Pop swears he saw it all. He said the lady spit and spewed for several minutes,complaining that the piece she had tried, was nothing more than cardboard and wax. She must have bitten into one of the chocolate covered graham cracker type, look alike cookies.The texture of the cardboard, when covered with wax appeared exactly like the real thing.I was so proud of the way they turned out. I only regret that the lady who had the horrible experience of biting into one of the cookies failed to see the tag.From what I could see,I think this very lady was the one who purchased the majority of my gift bags. Even though she didn't appreciate the cardboard and wax cookie, she surely did appreciate my talents in crafting.
 
a very  few of my gift bag contributions

more of my gift bag contributions
I usually have a hard time letting go of my crafts, but with this charitable function, it was much easier to let them go. I hope to donate to other charities in the future.I think I enjoy the giving, as much as I do the making of each arrangement.

Friday, April 27, 2012

A New Love

Wax Central
Faux Goodies
Faux Cherries
Who knew working with wax could be so exciting?  I recently found a candle warmer at a real deal. I had never used one before,but I am so glad I tried it.I use it to make the house smell of cookies baking,one of my favorite candles, but now that I have learned to use it for making all of the above pretties, I am addicted. I want to see just how many things I can make. I have had excellent results making the fake goodies.My next project,hopefully,will be grapes. I love grapes.I can't wait to try my hand at making them.

My sister,Mary,found a faux cherry pie which she adores, and the embellishments on it was not what she wanted, so I gave her 3-4 of my faux cherries to adorn the top of the pie.. I think she likes them a little better.

I was having trouble finding the colors I wanted for my wax, so I went to Etsy and ordered a few things.I can hardly wait to get them and try some new projects.

The cherries above are made from wooden beads dipped in red Apple Pie fragrance wax. I had no cherry fragrance wax.The stems are baggie ties. The leaves are made from felt.

Most of the goodies in the second picture are made of wooden blocks. The bon bons are made from sour gum balls. The chocolate wafers are from cardboard.The cupcake is made from a piece of foam rubber from an old cushion with spackle icing and regular cake sprinkles.The gingerbread cookie is a dog biscuit. All have been dipped in colored wax until I got the look I wanted. I am having so much fun with this project.Now if only I can find some use for the things I have made and plan to make.

Monday, February 27, 2012

Tiny Roses

tiny felt roses
My grand daughter, Leah, spent the day with us yesterday while part of the family gathered to watch the car races. She loves having what she calls a shing dig and she loves serving munchies. That is,for the most part, finger foods.Not really a sit down meal, but things you can pick up with you fingers and walk around with while you eat.We manage to compile plenty of munchies which she carried, one bowl at a time,out to Pop's  "pouting room" (the garage) where the rest were anxiously waiting to watch the race.She loves serving folks,too.When she had a free minute, she was sitting in the middle of the kitchen floor, making jewelry for some of her little friends at school. She had made herself a bracelet last week, with beads she found in my craft room, and some of her friends gave her orders for one of their own.I think she had about 4 requests, but only got 2 completed this weekend. The other two will have to wait another week, at least. I had made up a few little tags the day or so before, so I let her use a couple of them. I showed her how to type up the words to go on the tag s in a pretty font.She wrote....This bracelet was made for you by Leah Painter 2012.....then we shrank the words and printed them out in a pretty red font,cut them tiny and glued them on the name tags I had made earlier.
Leah's tags for her home made bracelets.Sorry. I failed to get a picture of the little bracelets.
I can hardly wait to  hear the reaction she got from her friends on the bracelets. I told her she might be a "trend setter" in her school. I also explained to her that her friends could ,hopefully,persuade their parents to take them to Walmart or Michael's and buy them some beads to make more jewelry for themselves and their friends.Leah agreed with me on the fact that many parents don't spend enough quality time with their kids teaching them such things as this.Leah never knew about the beads until now and she is 11. It's a great past time for little girls her age.Something they can wear and show off to their friends.Leah made hers in blue and white. She loves the Kentucky Wildcats. Another friend likes Louisville so her bracelet was in red.
The following day, I took the time to work with the tiny roses for some future tags. I decided to make them from felt, although there are multiple materials one could use to create all type of flowers. I have pictured the different steps I used to make the roses.

cut the felt in narrow strips
notch the tiny strips on one side and round off the corners on the ends

run a tiny line of glue along the strip and roll up like a jelly roll then set it aside to dry
cut your green felt into tiny squares rounding each one off in the shape of a leaf.Put a tiny dab of glue on one end and pinch the leaf together on that one end.When the leaf dries, glue one or two onto the tiny rose. Now they are ready to attach to your project. In this case ,my tags.Use your imagination as to what else would look pretty with the rose.Baby's breath, a ribbon,some lace,etc.Let your imagination run wild.

Sunday, February 19, 2012

Tags,Tags,Tags


I love making tags. I have cut out lots of free hand tags and I have ordered a tag punch off E-bay.Although I enjoy making tags from both methods, I think I prefer the more personal touch with the home made, hand cut tags. 

The tags cut with the punch are nice and uniform, and I do like them, but part of the joy for me is in the mixing and matching of the pretty paper and fabrics on my home made tags. I am not neat and orderly and organized in my crafting, like many of the bloggers I read. My crafting is more of a hap hazard, hit and miss nature.I'll try anything once,maybe twice. If I enjoy a particular craft, I will use it again. If not, I'm done with it, for the most part.

The bottom picture is some of the tags I made today for my hand made items. I have no plan as to what I will do with all of the crafts I have made and accumulated, but they will have pretty tags,no matter where they end up..
I enjoy making the pretty tags as much, if not more, than making the item it is used on.Go figure!

Saturday, February 18, 2012

Another Landfill Save

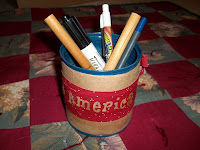
This project started out as an attempt at a Primitive project, but quickly turned into more of an Americana project.The shelves where I keep my partially used cans of paint, were not lighted good,plus the caps were missing on many, so you know the rest of the story.The color of paint I thought I was using turned out to be blue instead of black.No need to get bent out of shape over the color. I just proceeded to make an Americana pencil holder of sorts.A great project I can use to keep little ones involved on Monday.They will be out of school, so they will be coming for a visit.I'm hoping it will hold their interest for a few minutes anyway.


The only supplies needed was (1) a can.
 I recycle all cans,so there are several clean ones in the holding bin.
(2) A piece of pretty paper of their choosing,I have loads of pretty paper.
(3)a strip of fabric of their choosing of which I have loads.
(4)glue and I have several bottles of glue.
(5)Lettering of their choosing

Not such a hard project.It's just a matter of keeping them at it, until it's finished. That's the hard part.
Leah is 11 and John is 7, and neither of them likes to work at any one project for very long.Hopefully, I can hold their attention until the cans are completed.Maybe if I offer to post their can pictures, they will do a better job.

Tuesday, January 17, 2012

Tiny Books


my first book(excuse my rough nail polish) made using a toilet tissue tube
It's been awhile since I have posted on this blog, so I thought I would use an idea my sister,Vicki, gave me while she was visiting us,for a spell,here in Kentucky.I have mentioned that I enjoy small projects, many times, and I enjoy making something from things,others would discard. As I was telling her this, I mentioned the fact that I hate to toss out the inner core of the toilet tissue roll. I can think of so many things to do with it. It is such a waste to discard it.That's when she began telling me about making these little books.It was just the kind of project I thought I might enjoy.I experimented with some of my small pieces of fabric, which I have boocoodles of,but it takes such small pieces to make the book covers, I'm sure it will not make a dent in my supply.

I used the tissue core to make this book, but one make others using the boxes from cereal and such.

First,I took the cardboard tube, and rubbed the interior with Elmer's glue, then pressed it flat under a stack of book or something flat and heavy. Once it was dry, I covered it,back and front, with fabric.

cardboard for cover,fabric for outer and interior of cover
glue outer cover first,then the inner cover,barely overlapping the edge of the outer cover
After gluing the outer cover, let it dry a bit, then glue the interior cover,which is cut a bit smaller,just enough to overlap the edge of the outer cover.Press as flat as possible, rubbing all of the air bubbles out, then place between 2 sheets of plastic bag,just in case the glue squeezes out,and place under a flat heavy object to dry completely.

Once your little cover is completely dry,fold it perfectly in half, and make your little pages for the inside of your book using white paper,cutting it just the right size,when folded in half,to fit inside the cover.Use a tiny line of glue to secure the pages inside the cover.Hence, you have made an adorable little book.Just big enought to write a message inside, and attach it to a gift for someone special.You can use your imagination to embelish it more,if you wish.

Thursday, December 1, 2011

My "Whatever Jars"


I am a helter skelter kinda crafter. I jump from craft to craft,before ever finishing any one thing. I can always go back and work on any craft that is unfinished,if I so desire. If I don't go back to it, then it's not my kind of craft anyway.If it doesn't hold my interest long enough to finish it, or at least come back to it, it's not worth my time to continue on with it.I'm off to something else.Some crafts keep me so interested, I wake up at 3 in the morning,dying to get to them. Those are the ones I really like. This one little project I have found, interests me to no end. I love,love,love it. As you can see by one of the above pictures, I have been working at a few different things. I love working with wood, fabric, paint,stenciling,and now making labels and tags from scraps of paper. The fact that they are so pretty and appealing to me, and cost nothing to make,really excites me.I am guilty of being extremely frugal or to put it plain and simple,a tight-wad, when it comes to spending on craft supplies. The label and name tag project has consumed me lately. I visit the consignment shops and find the Primitive decor to be more and more appealing,especially when it comes to my crafting.The grungy look,especially, seems to come easier for me to replicate.

For this particular project, I am using pretty little jars that would otherwise be recycled,at least, that's what I would do with them if I found no other use for them.Jars are a weakness of mine, too.Especially, little jars, and reusable jars. Some jars have those twist on lids, and even those can be used in gift giving. There are lots of dry mixes that do not require being sealed when given as a gift to be used right away. I have a few books on those types of gift mixes.Now back to my labels and tags for the cute little jars.(The little wooden plaque was replicated from a tea towel I purchased just for a pattern.)

I collect brown paper(and lots of other pretty papers)for use in my tag making. The brown paper that comes as packing in the mail,(Thanks,BJ)the lining of the sugar bag.There are many ways in which brown paper comes into my home.Then I gather up small pieces of pretty colored  fabric or paper that is too small to be used for anything else.I cut the brown paper label a bit larger than the colored piece of material being used. I cutesy up the two pieces by trimming the corners of both pieces(unless you prefer the plain squared off corners).Then I apply a drop or two of glue to secure the 2 pieces together.I use my hole punch to make the hole for the ribbon.When I am ready to apply the name or directions to the label, I go into WordPad and type up my wording in a cute font and color,and make the words as small as possible in order to fit on the label.You can usually make a whole page of usable wording for later use, so as not to waste too much paper by just printing out one word or two.
For the decorative band around the little jar,I cut a long narrow strip of brown paper, just long enough to fit around the jar and overlap about  1/2 inch so as to be glued later. I use my hole punch and punch holes along the brown paper strip for weaving a matching ribbon through. Once the ribbon is woven through the holes, and the label is assembled and attached, then tie the ribbon in a cute bow.Wallah! Your gift jar is ready to be filled with a goodie of your choice for a dear friend or a loved one for the next upcoming holiday that requires a gift. I hope you,too,are having a Happy Crafting experience, preparing for the Happy Holiday Season ahead!

Isn't it cute?And cost free,too.